How to Remove Yakima Roof Rack: Easy Step by Step Guide
Removing your Yakima roof rack might seem tricky, especially if you’re worried about damaging your vehicle or struggling with stubborn bolts. You’re not alone—many people find it challenging to take off roof racks smoothly.
But don’t worry, with the right tools and a little patience, you can do it easily at home.
To remove your Yakima roof rack, start by gathering the right tools like a Torx or Allen wrench, and make sure your vehicle is parked on a flat, stable surface. Loosen the clamps and mounting hardware carefully, supporting the crossbars and feet as you detach them to avoid damage.
Check for rust or stuck bolts, and use penetrating oil if needed. Once you’ve removed all components, inspect your roof for any damage.
Keep following along to find out more expert tips for a smooth removal.
Key Takeaways
Gather your tools like a Torx or Allen wrench, a key for the locks, and a socket wrench before you get started. Having these ready will make the removal process smoother.
Next, carefully loosen and remove the crossbars and mounting feet, supporting the parts as you go to prevent any damage. Take your time to avoid scratching or breaking anything.
Use the key to unlock and detach the clamps or locks. Make sure you’re in a well-lit, stable place to work safely and efficiently.
After removing the roof rack, inspect the roof area for any debris or damage. It’s also a good idea to store the hardware safely for any future reinstallation.
Finally, check the mounting points to ensure everything is secure and clean the area. This will help maintain your vehicle’s integrity and readiness for the next adventure.
Tools Needed to Remove a Yakima Roof Rack
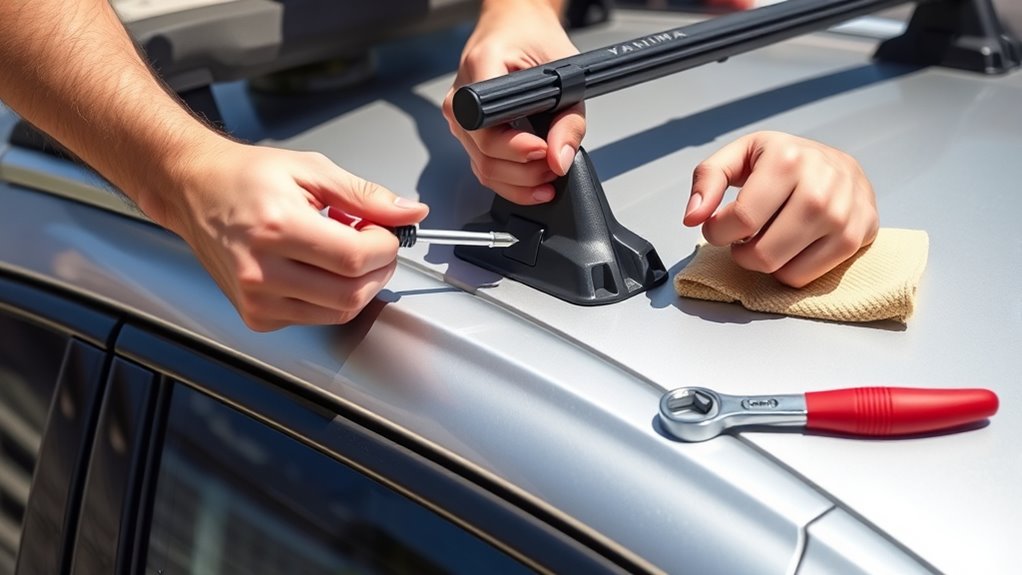
Before you start removing your Yakima roof rack, gather a few essential tools. You’ll need a Torx screwdriver or Allen wrench, depending on your model, to loosen and remove the mounting hardware.
These tools are common accessories that make the job straightforward. It’s also a good idea to have a soft cloth or towel to protect your vehicle’s paint when handling parts.
If your rack uses locks, you’ll need a key to release and remove the components. Some models require a socket wrench for bolts, so keep one handy as well.
If you’re thinking about an alternative storage option afterward, having a basic set of hand tools makes the process easier. Remember, having the right tools helps speed things up and prevents accidental damage.
Check your Yakima manual for your specific mount type to make sure you have everything needed before you begin.
Preparations Before Removing Your Roof Rack
Making sure your vehicle is ready for roof rack removal helps prevent accidents and damage. Start by inspecting the material—whether it’s aluminum, steel, or composite—to spot any rust, corrosion, or loose parts. Addressing these issues ahead of time makes the removal safer and easier.
Inspect your roof rack material for rust or loose parts to ensure safe and easy removal.
Check the weather forecast—it’s best to avoid working during rain, snow, or high winds. Wet conditions can make surfaces slippery and could compromise your safety. If the weather looks clear, park your vehicle on a flat, stable surface, engage the parking brake, and gather your tools and safety gear.
Clear the area around the roof rack and your vehicle so you have plenty of room to work comfortably. Taking these steps reduces the risk of damaging your vehicle or hurting yourself during removal.
Proper preparation makes the process smoother, whether you’re removing the rack temporarily or planning to replace it.
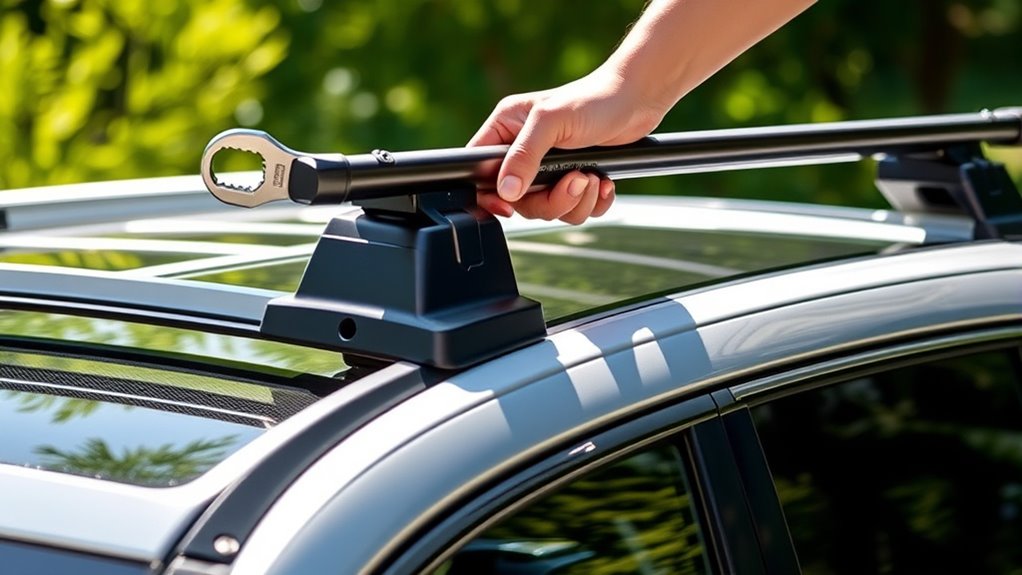
Safely Loosen the Roof Rack Clamps
Start by finding the clamps that hold the roof rack in place. These secure the accessories to your vehicle’s mounting points.
Next, grab the right tools—usually a wrench or screwdriver—to loosen them properly. Turn the clamps counterclockwise to gently release the tension.
Be careful not to overtighten or strip the screws, as that could damage the mounting parts or accessories. If your clamps can lock, use the key to unlock them first.
Work in a well-lit area so you can see all the components clearly. Once the clamps are loosened, hold them steady as you remove or adjust the roof rack.
Taking your time helps prevent any damage to your vehicle or the roof rack accessories. This way, you can remove or adjust everything safely and effectively.
Removing Crossbars and Mounting Feet
Start by loosening the mounting screws a little bit. This will free up the crossbars and mounting feet. Once the screws are loose, carefully remove the crossbars — take your time so you don’t accidentally damage anything.
Next, gently detach the mounting feet from the vehicle roof. Just follow these steps carefully, and you’ll make the whole process safe and smooth.
Loosen Mounting Screws
Have you located the mounting screws securing the crossbars and mounting feet? Next, you need to loosen the mounting bolts.
Use a screwdriver or a socket wrench, depending on the type of fasteners used on your Yakima rack. Be sure to apply steady pressure and turn counterclockwise to loosen.
Keep in mind that some screws might be snug, so don’t force them. Try a different tool or apply a bit of penetrating oil if needed.
As you loosen the mounting screws, be careful not to damage the roof lining underneath. Once loosened, you can gently lift the crossbars and mounting feet away.
Be careful not to pull too hard to prevent scratching or denting your vehicle’s roof.
Remove Crossbars Carefully
Once the mounting screws are loosened, carefully lift the crossbars away from your vehicle’s roof, making sure to hold them firmly so they don’t slip or drop.
Pay close attention to how the crossbars are aligned as you lift, ensuring they stay level and straight. If you feel any resistance, check that the mounting foot adjustments aren’t causing friction or misalignment.
While removing the crossbars, keep a steady grip to prevent sudden slips that could scratch or damage your vehicle. Supporting them properly also helps avoid bending or warping.
After removing the crossbars, set them aside on a soft surface to prevent scratches. Taking your time makes the process safe and helps you avoid any damage, setting you up for the next steps smoothly.
Detach Mounting Feet
Before removing the mounting feet, make sure you’ve already taken off the crossbars and loosened any locking mechanisms.
Check that the mounting foot is compatible with your vehicle to confirm proper removal. Usually, the feet are secured with bolts holding the roof rack’s weight in balance.
Use a wrench or screwdriver to carefully unscrew these bolts, being mindful not to strip them. Support the mounting feet as they come loose to prevent any damage to the roof or rack components.
Once the bolts are removed, lift the mounting feet away from your vehicle. Keep the hardware safe in case you reinstall the roof rack later.
Removing the feet correctly helps protect your vehicle and ensures the roof rack weight is properly managed.
Detaching the Mounting Feet From Your Vehicle
Are you ready to detach the mounting feet from your vehicle? Start by removing any roof rack accessories, like cargo carriers or bike mounts. These can make things trickier, so make sure they’re out of the way.
Find the bolts or screws holding the mounting feet to your roof. Use a compatible wrench or screwdriver to carefully loosen and lift each foot away. If your roof rack uses clips or clamps, follow the specific instructions for those parts to avoid damaging your vehicle’s paint or roof panels.
Keep the mounting hardware organized so you don’t lose any pieces. After removing all the mounting feet, double-check that all bolts or clips are accounted for. Store them safely for future use.
Removing the mounting feet is pretty straightforward if you work methodically and handle each piece with care.
Cleaning and Inspecting Your Roof After Removal
After removing the mounting feet, take a close look at your roof to spot any dirt, debris, or residue left behind. Cleaning now helps prevent rust and keeps your vehicle looking sharp.
Use a soft cloth or sponge with mild soap and water to gently clean the area. Check for any scratches or paint chips that might need a touch-up.
To keep your roof in top shape, consider these tips:
- Use a microfiber cloth to avoid scratches during cleaning.
- Apply a protective wax or coating to seal the surface.
- Regularly inspect your roof for signs of wear or damage.
Customer reviews often say that routine cleanings help extend the life of your vehicle’s paint and prevent costly repairs.
Keeping your roof properly maintained is simple and effective. These quick steps will help ensure your vehicle stays in great shape and looks good, even after taking off the roof rack.
Troubleshooting Common Roof Rack Removal Issues
Removing a roof rack can sometimes be tricky, especially if bolts are stuck or parts are corroded. To troubleshoot common issues, make sure you’re using the right tools and follow the installation instructions closely.
Compatibility issues can also make removal difficult. Double-check that your roof rack is designed for your vehicle before starting. Rust or corrosion may lock bolts in place, so applying penetrating oil or gentle heat can help loosen them.
Here’s a quick reminder:
| Issue | Solution | Prevention |
|---|---|---|
| Stuck bolts | Use penetrating oil, proper tools | Regular inspection and lubrication |
| Corrosion | Try rust remover, apply heat gently | Keep hardware clean and dry |
| Compatibility problems | Review installation guidelines | Confirm roof rack fits your vehicle before removal |
| Parts breaking | Use gentle force, avoid forcing things | Follow proper removal steps |
Careful troubleshooting helps prevent damage and makes the removal process smoother.
Reinstalling or Replacing Your Yakima Roof Rack
Here are some tips to make the process smoother:
Double-check that the roof rack is compatible with your vehicle before you buy it. This way, you’ll avoid any fitting issues later on.
Verify roof rack compatibility with your vehicle to prevent fitting problems later on.
Use a torque wrench to ensure all bolts are tightened correctly. It helps prevent over-tightening or under-tightening, which can cause problems.
Make a habit of inspecting the rack regularly for loose bolts or signs of wear. Staying on top of maintenance keeps everything secure and in good shape.
Safety Tips for After Removing Your Roof Racks
After you take off your roof rack, it’s a good idea to double-check for any loose parts. You don’t want something to come loose while you’re driving! Just take a quick look to make sure everything is secure.
Next, give your vehicle a once-over to see if there’s any damage or weak spots where the rack was installed. It’s better to catch any issues early before hitting the road again.
Doing these simple steps can help keep your car safe and in great shape, so you’re all set to go back to normal driving without worry.
Check for Loose Parts
Have you checked for loose parts after removing your Yakima roof rack? It’s important to make sure nothing’s left behind that could damage your vehicle or be a safety hazard.
Start by inspecting the areas where the roof rack accessories were attached. Look for any bolts, screws, or brackets that may have come loose during removal.
Keep in mind that some components might be hidden or tucked away, so double-check thoroughly. Also, verify that the mounting points still match your vehicle’s compatibility to avoid future issues.
Make sure all bolts and screws are tight or stored safely, and remove any leftover pieces or debris from the roof. Finally, confirm that nothing is interfering with your vehicle’s integrity.
Inspect Vehicle Integrity
Wondering how to guarantee your vehicle remains safe and secure after removing the roof rack? Start by inspecting your vehicle’s integrity. Check the area where the roof rack accessories were attached for any signs of damage or weakened spots.
Verify there are no cracks, dents, or rust that could compromise your vehicle’s structure. Confirm that all mounting points are clean and intact, and that no residual hardware remains.
Proper vehicle maintenance includes keeping these parts in good condition, so your vehicle stays safe on the road. If you notice anything unusual, consider consulting a professional.
Removing the roof rack shouldn’t affect your vehicle’s stability or safety, but regular inspections help prevent future issues. Doing this step guarantees your vehicle stays in tip-top shape.
Next Steps to Keep Your Vehicle Protected
Once you’ve removed the roof rack, taking specific steps can help protect your vehicle and keep it looking good. Start by cleaning the area where the rack was attached to remove any leftover adhesive or debris. This helps prevent rust and keeps your vehicle looking fresh.
Next, check the remaining roof mount points for rust or damage. If needed, apply a protective coating to keep everything in good shape. To avoid problems with future accessories or compatibility, keep a record of your vehicle’s specs and compatible parts.
When shopping for new racks or accessories, double-check that they will fit properly. Properly storing your removed rack will prevent damage and make it easier if you decide to reinstall it later. Regular maintenance and careful handling are key to keeping your vehicle in top condition, whether you plan to put the rack back on or leave it off.
Frequently Asked Questions
Can I Remove My Yakima Roof Rack Without Professional Help?
Yes, you can remove your Yakima roof rack yourself. Just start by inspecting the mounting points for accessible bolts or screws.
Use the right tools and carefully detach the rack to avoid any damage. This makes it easier to do any alternative mounting or roof rack maintenance you might need.
Make sure to keep all parts organized, and remember to follow safety precautions. If you’re unsure about anything, checking the manufacturer’s instructions can help you do it right without needing professional help.
How Long Does It Typically Take to Remove a Yakima Roof Rack?
Removing a Yakima roof rack usually takes about 15-30 minutes, depending on your vehicle and your experience. Notably, cleaning your roof rack after removal can increase its lifespan by about 20%.
The process tends to be quicker on compatible vehicles because of standardized mounting systems. If you have the right tools and follow the guidelines, you’ll save time and effort.
This way, your vehicle stays in great shape for future use.
Will Removing the Roof Rack Damage My Vehicle’s Paint?
Removing your Yakima roof rack shouldn’t cause paint damage if you take the right precautions.
Use gentle tools like a plastic pry tool to avoid scratching your paint, and work slowly so you don’t apply too much pressure.
Before you start, it’s a good idea to clean the area and check for any loose parts.
Taking these simple steps will help protect your vehicle’s paint and ensure the removal process goes smoothly without causing any damage.
Are There Any Tips for Storing the Removed Yakima Rack?
Thinking of turning your garage into a Yakima rooftop museum? First, give the rack a good clean to keep it in top shape.
Store it in a dry, cool spot away from direct sunlight to prevent paint from fading. Using foam padding or a blanket helps protect it from scratches.
Secure the rack with straps or a box to keep it safe during storage. Proper tips like these will keep your rack pristine and ready for your next adventure.
Is It Necessary to Replace Any Parts After Removal?
You don’t need to replace parts after removal unless they’re damaged or worn.
Before reinstalling, check installation considerations to ensure proper fit and function. Removing the rack shouldn’t affect your warranty if you follow manufacturer instructions.
However, it’s a good idea to confirm warranty implications with Yakima. Keep all removed parts and hardware safe, as missing components could cause issues during reinstallation or future use.
Conclusion
Removing your Yakima roof rack is straightforward once you follow these steps carefully. For example, imagine you’re preparing your car for a long road trip and want a cleaner look—removing the rack is quick and easy.
Just make sure you’ve got the right tools and follow safety tips. With a little patience, your vehicle will be ready for its next adventure, whether it’s a mountain climb or a family vacation.
If you need help, take your time and follow the step-by-step guide to remove your Yakima roof rack with ease.