Dealing With Car Oil Leak on Driveway: Prevention, Identification, and Repair Tips
Dealing with a car oil leak on your driveway can be frustrating. Many car owners struggle with unsightly stains and the worry of potential engine issues. If you’re tired of those stubborn oil spots, you’re not alone.
Luckily, with a bit of know-how, you can prevent and fix leaks before they become bigger problems.
If you notice oil spots on your driveway, start by inspecting common leak points like the oil filter, gasket, and drain plug. Regularly check your oil levels and look for signs like a burning smell or puddles.
Replace damaged seals, tighten loose bolts, and use quality oil and filters during maintenance. Acting quickly can help you avoid costly repairs in the future.
Want more tips on preventing and fixing leaks? Keep exploring for detailed guidance.
Key Takeaways
- Regularly check your vehicle for fresh oil stains and wet patches to spot leaks early.
- Focus on common leak sources like valve cover gaskets, the oil pan, and filters for targeted fixes.
- Make sure drain plugs are properly torqued and replace worn seals quickly to stop leaks.
- Clean the affected areas and use absorbents immediately to keep leaks under control and prevent driveway stains.
- If leaks get worse, cause engine problems, or stick around after basic repairs, don’t hesitate to get professional help.
How Can I Tell If My Car Has an Oil Leak?
If you suspect your car has an oil leak, check for visible signs under the vehicle. Look for puddles or spots of oil on your driveway, especially after parking overnight.
Smelling burning oil or seeing smoke from the engine can also point to a leak. To be sure, listen for unusual engine noises or warning lights on the dashboard.
Burning oil scent or smoke signals leaks—listen for strange engine noises or check dashboard warning lights.
Inspect the oil filter—if it’s loose, damaged, or covered in oil, it might be the leak source.
You can also look for oil spots on engine parts or around the oil pan. Regularly check your vehicle’s oil levels with the dipstick.
If the oil dips quickly or looks dirty, it’s time to investigate further.
Being alert to these signs helps you catch leaks early before they cause serious engine damage.
What Causes Oil Leaks in Vehicles?
What often causes oil leaks in vehicles? Over time, engine oil can seep through worn or damaged seals, gaskets, or plugs. Poor engine oil viscosity, when the oil is too thick or too thin, can make leaks easier to develop, especially if the oil isn’t the right type for your engine.
Neglecting to replace your oil filter regularly can also lead to leaks. A clogged or improperly installed filter might not seal properly, letting oil escape. Another common cause is over-tightening or under-tightening drain plugs and oil pan bolts, which can damage threads or create gaps.
Age and accumulated grime weaken engine parts, making leaks more likely. Keeping up with maintenance and choosing the correct oil viscosity can prevent many of these issues. Regular inspections help catch early leaks before they turn into bigger problems, keeping your engine running smoothly and preventing oil from seeping onto your driveway.
Signs That Indicate a Developing Oil Leak
Early signs of an oil leak can be subtle, but it’s important to pay attention to them to avoid bigger problems. You might notice a small puddle forming under your vehicle or oil spots on your driveway, which can indicate seal deterioration.
Regularly check your oil level to remove guesswork. A sudden drop in oil can signal leaks from seals or oil deterioration inside the engine. Be on the lookout for a burning oil smell, which suggests a leak near hot engine parts.
Oil discoloration under the hood or on engine components can also point to developing leaks. Keep an eye out for changes in engine performance, like misfires or reduced power, which might be caused by insufficient lubrication from a leak.
Recognizing these early signs helps you avoid more serious engine damage and costly repairs. Addressing even small issues promptly can keep your vehicle healthy and stop oil problems from getting worse.
How Do I Locate and Inspect the Leak?
First off, take a good look at your engine and underneath your car. You’re looking for any fresh oil spots or wet patches that might stand out. Sometimes, a quick glance can reveal a lot — just see where oil seems to be oozing or dripping.
Next, focus on the usual trouble spots. Check the oil filter, drain plug, and valve covers. These areas are common leak sources because they’re where oils are drained or sealed. Having a good idea of these spots can really help you figure out where the leak might be coming from.
Visual Leak Inspection
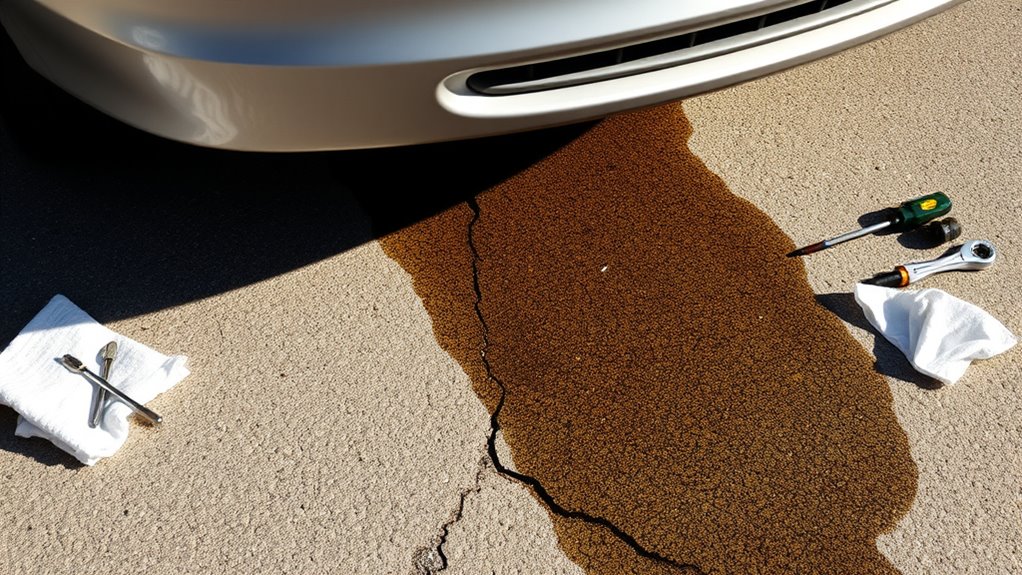
To locate a car oil leak through visual inspection, start by parking your vehicle on a flat, well-lit surface and making sure the engine is completely cool. Good lighting makes it much easier to spot fresh oil stains.
Focus on areas beneath the engine and along the driveway where oil might drip or pool. Look for dark, shiny stains with clear edges that indicate recent leaks.
Also, check for spots where grime and oil have combined, creating a streaked look. Pay attention to the color contrast of oil against the concrete surface.
Fresh oil usually appears darker and shinier than older, dried stains. Take your time scanning in good light so you don’t miss any signs of leakage.
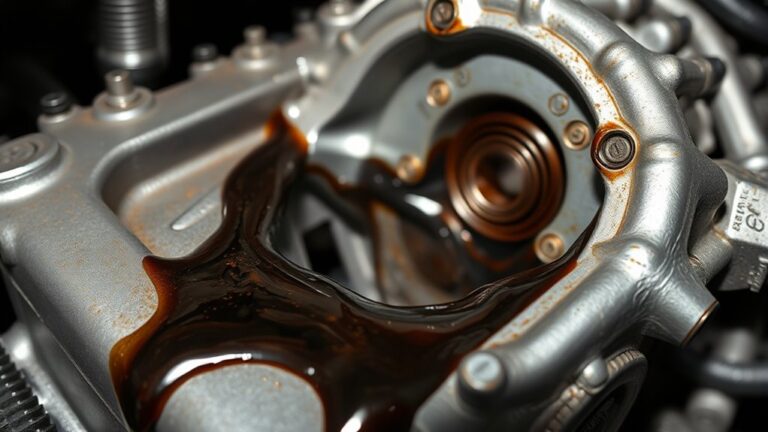
Identify Oil Drainage Points
Begin by identifying the common drainage points where oil exits the engine. Usually, oil leaks happen around the valve cover gasket, oil pan gasket, oil filter, or drain plug. Check these areas carefully for fresh oil stains or drips.
To make leak detection easier, look for wet or shiny engine parts, especially when the engine is running at low speed. Use a flashlight to follow the flow of oil from the highest point to where it collects or drips.
Remove any dirt or debris that might hide the leak source. Feel for wet areas or hardened oil residues around seals and gaskets.
Focusing on these points helps you find the origin of the oil leak faster. This makes repairs easier and helps prevent further damage.
Tools You Need to Fix Small Oil Leaks at Home
If you’re looking to fix small oil leaks at home, the first thing you’ll want to grab is a good repair tools kit. Don’t forget to gear up with safety equipment too, like gloves and goggles, to keep yourself protected throughout the process.
It’s a smart idea to set up everything step-by-step before you start. That way, you’ll be sure you have all the tools ready and won’t have to stop in the middle of your work. Knowing which tools to use and taking the right safety precautions will make the job not only safer but also go much more smoothly.
Essential Repair Tools Kit
Having the right tools on hand makes fixing small oil leaks at home much more manageable. A basic repair tools kit ensures you’re prepared to tackle issues promptly.
You’ll need a quality wrench set to loosen or tighten fittings, a socket set for fast, secure work, and screwdrivers for various clamps and covers.
Furthermore, understanding engine temperature helps you work safely, especially if the oil’s viscosity is thick or thin.
The correct tools streamline the process and prevent damage to components. A well-chosen toolkit allows you to check oil levels, replace gaskets, or tighten loose fittings effectively.
With the right tools, you can address small leaks early, saving you time and money while safeguarding your engine’s health.
Safety Gear Requirements
An essential part of fixing small oil leaks safely at home is wearing the right safety gear to protect yourself from potential hazards. Make sure you have protective clothing that shields your skin and clothes from oil spills and chemicals.
Wear gloves made from chemical-resistant material to avoid skin irritation or absorbing harmful substances. Safety goggles are also vital to protect your eyes from splashes.
Long sleeves and pants add extra protection against accidental contact with oil or cleaning agents. Respirators or masks can be necessary if you’re working with strong chemicals or in poorly ventilated areas.
Prioritizing proper safety gear minimizes risks and keeps you safe while repairing your car’s oil leak.
Step-by-Step Equipment Setup
Gathering the right tools is your first step before tackling a small oil leak at home. To identify and fix the leak accurately, you’ll need some basic equipment. Imagine engine animations working behind the scenes as you prepare.
Expect to detect the oil scent lingering in the air, hinting at where the leak originates. Here are essential items to have ready:
- A jack and jack stands to raise the vehicle safely
- A set of wrenches and screwdrivers for loosening and tightening components
- A clean, absorbent cloth or rag to wipe away excess oil and inspect the affected area
These tools will help you access the leak point efficiently. Proper setup guarantees you can work comfortably and see exactly where the engine animations reveal the elastic oil escape.
How to Repair a Minor Oil Leak Safely
To repair a minor oil leak safely, start by identifying where the leak is coming from. Inspect your engine carefully, paying close attention to engine seals and gaskets, since these are common leak spots.
Look out for leaks around the oil pan, valve cover, or oil filter area. Keep in mind that if your car uses synthetic oils, the thinner fluid can seep through small cracks more easily, making leaks trickier to spot.
Once you’ve found the leak, clean the affected area with a degreaser. This makes it easier to see exactly where the oil is escaping. If the leak is due to worn or damaged engine seals, replacing them is usually straightforward, but be sure to follow the proper procedures for your vehicle.
Always wear gloves and work in a well-ventilated area. These precautions help you repair the leak safely and avoid causing any further damage.
When Should I Seek Professional Help for an Oil Leak?
While minor oil leaks can often be fixed with simple repairs, you should see a professional if the leak gets worse or if you’re unsure what’s causing it. If you notice fresh oil pooling after changing the oil filter or using synthetic blend oil, it’s a good idea to have an expert take a look.
Persistent leaks that don’t stop after tightening or replacing seals could mean there’s a deeper issue that needs diagnosing. Also, if you’re uncertain whether the leak comes from the oil pan gasket or a damaged oil filter housing, a mechanic can help identify the exact problem.
Keep an eye out for a significant slowdown in oil consumption or uneven engine performance, as these can be signs that the leak may be affecting your engine’s health. You should definitely seek help if the oil leak continues despite your DIY efforts, if the oil filter or synthetic blend oil is leaking heavily, or if oil spots are increasing daily.
Preventing Oil Leaks: Tips to Keep Your Car Dry
Regular maintenance and careful inspection are key to preventing oil leaks and keeping your car dry. Start with routine engine care to make sure all parts are working properly.
Check your oil levels regularly and look for signs of leaks under the vehicle. Replacing worn or damaged oil filters is essential because a faulty filter can lead to oil buildup and leaks. When changing filters, follow proper procedures to tighten them well—loose filters are a common leak cause.
Keep an eye on seals, gaskets, and drain plugs for any signs of wear or deterioration, and replace them promptly. Making sure bolts are properly torqued during oil changes helps prevent leaks around filters and drain plugs. Addressing small issues early on can save you bigger headaches later and keep your engine running smoothly.
Finally, watch out for unusual oil spots on your driveway, and regularly check your engine bay for any seepage. Staying on top of these checks helps keep your car leak-free and dry.
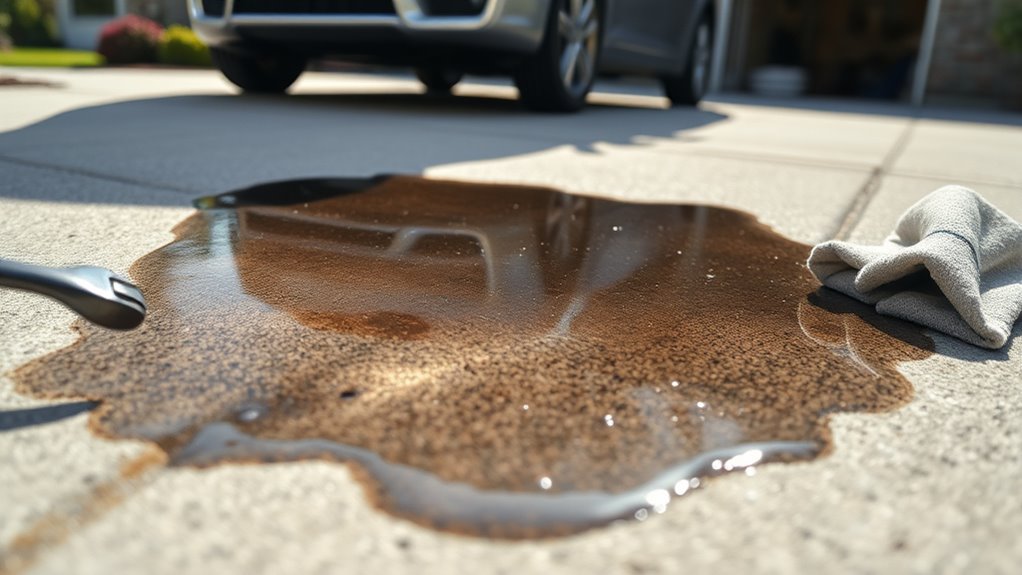
How Can I Minimize Oil Stains on My Driveway?
Oil stains on your driveway can be stubborn, but you can minimize them by acting quickly whenever you notice a leak. Starting treatment early helps prevent the stain from setting in.
Keep in mind, when your engine runs at a higher temperature, oil viscosity can change, making leaks more or less severe. Monitoring your engine’s temperature can help you catch leaks sooner.
Using absorbent materials like kitty litter, baking soda, or asphalt patch right after noticing a leak can soak up excess oil before it spreads. This simple step can make a big difference.
Furthermore, applying a commercial degreaser or driveway cleaner helps break down existing stains, making cleanup easier. Regularly inspecting your car for leaks and adjusting your driving habits also reduce the amount of oil reaching your driveway.
Prompt action, combined with understanding how engine temperature and oil viscosity affect leaks, will help keep your driveway clean and stain-free.
Routine Maintenance to Prevent Future Oil Leaks
Consistent routine maintenance is key to preventing future oil leaks and keeping your engine running smoothly. Regularly check your engine oil levels and top off with high-quality oil to prevent dry starts that can damage seals. Consider using engine oil alternatives if you want options that may last longer or perform better under certain conditions.
Always replace your oil filter with a quality replacement oil filter during oil changes. A worn or clogged filter can cause leaks and engine damage. Also, inspect oil seals and gaskets periodically for signs of wear. Keeping a maintenance schedule helps catch small issues early before they turn into costly leaks.
Frequently Asked Questions
How Long Does It Typically Take to Repair an Oil Leak Professionally?
It usually takes about 1 to 3 hours for a professional repair shop to fix an oil leak, depending on what’s causing it. If the leak is from the oil pan, they’ll drain the oil, replace the gasket, and reseal it.
For a valve cover leak, they’ll remove the cover, change the gasket, and reassemble everything. More complicated leaks might take longer, but most repairs are done within a few hours.
Are There Any Environmental Concerns Related to Oil Leaks and Cleaning?
Environmental impact is a real concern with car oil leaks. Oil can contaminate soil and waterways, harming wildlife.
Cleaning up leaks improperly can lead to pollution. You should avoid this by using eco-friendly cleaning methods and containing spills quickly.
Regular maintenance helps reduce leaks and minimizes environmental risks. Being proactive is key to protecting the environment.
Taking quick action and choosing the right cleaning methods keep your driveway and surroundings safe from oil-related hazards.
Can Using Additive Products Prevent or Slow Down Oil Leaks?
Using additive products can help improve their effectiveness and might slow down leaks a bit. These products often contain sealants or conditioners that coat engine parts, which can reduce minor leaks.
But they’re not a guaranteed fix, especially for bigger leaks. Think of additives more as a preventive tool rather than a cure.
Don’t rely solely on them for major leaks. Regular maintenance and quick professional repairs are still your best bet for dealing with oil leaks.
What Are Common Mistakes to Avoid When Attempting DIY Oil Leak Repairs?
Did you know that improper DIY repairs can make more than 50% of vehicle oil leaks worse?
When fixing oil leaks yourself, avoid common mistakes like not using accurate leak sensing techniques or rushing through the process.
If you skip proper oil stain removal after repairs, future leaks become harder to spot.
Take your time, use the right techniques, and don’t forget to seal all potential leak points.
This way, you’ll help ensure your DIY repairs are successful.
How Often Should I Check for Oil Leaks After a Repair?
You should check for oil leaks within days after a repair, then regularly afterward, especially during the first few weeks.
Pay close attention to the oil gasket area, as leaks often come from there. Use leak detection techniques like visually inspecting for drips or smelling for burnt oil.
After each check, look out for signs of fresh oil and make sure the repair is holding. This helps prevent engine damage or stains on your driveway.
Conclusion
Addressing oil leaks early can save you both time and money. Imagine spotting a small drip from your car’s engine during a routine check—that’s your cue to act before it turns into a costly repair.
Regular maintenance and prompt repairs keep your driveway clean and your car running smoothly. Don’t ignore those early signs; a quick fix now can prevent bigger headaches later.
Dealing with oil leaks early with prevention, identification, and repair tips helps you keep your vehicle in top shape for miles to come.